Mostrando entradas con la etiqueta artist. Mostrar todas las entradas

miércoles, 17 de abril de 2013

My new website!


Hi my friends! I'm happy to show you today my new website!! :D I wanted to create a simple and professional portfolio...and here it is! Your are welcome to visit it! :)


Instagram: @alejandraptoba
It was my first experience creating a website and it was pretty fun! I used Iweb (Mac software) because I'm still learning how to use Dreamweaver. Iweb it's a really easy tool for creating webs, you don't have a lot of options, but I think that with a bit of creativity you can get a professional look for your site. I must admit that I'm very happy with the result! :)
I launched too a facebook fan page, there I'll post more info about my works in progress and my artwork:


... and I've also created this visiting cards! ^_^ I'll do an art  exhibition in a few weeks and it will be the time to release them. :)


jueves, 3 de enero de 2013

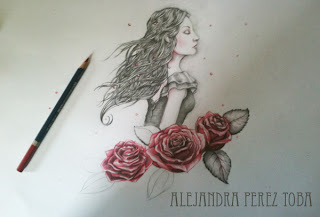
Roses

"Roses, 2012"


¡Primer post del 2013! :) Hoy os traigo algunos pasos de como cree el dibujo "Roses". Fue un trabajo muy poco planeado pues lo hice por diversión, así que la composición fue saliendo durante la marcha. Antes de nada me gustaría disculparme por la mala calidad de las imágenes ya que fueron tomadas desde un teléfono n_nU

Materiales utilizados:
· Papel canson tamaño A3, 130gr/m2 ·
· Portaminas con minas B2 ·
· Lápiz rojo acuarelable · 
· Lápiz blender de Derwent ·
· Difuminos de papel ·


"First post of 2013! :) Today I bring you some steps of how I created the drawing "Roses". I did this work just for  fun and without planning it too much. I would like to apologize for the quality of the photos, they were took with a mobile phone n_nU"

Tools: 

· Canson A3 Paper, 130gr/m2 ·
 · 2B Mechanical pencil · 
 · Red watercolor pencil ·
· Derwent blender pencil ·
· Paper stomp ·


Para comenzar hice un boceto rápido, para encajar los elementos que planeaba introducir en el dibujo. Siempre prefiero empezar definiendo los rostros y luego seguir con el resto.

 "The first step was to draw a quick sketch to place the elements of the drawing. I always prefer to draw the faces first, and then continue with the rest of the work."

Una vez estaba medio definida la cara comencé a  detallar el pelo y las pequeñas esferas situadas en primer plano .

"When the face was almost finished I started to detail her hair and the small spheres  in the forefront."
Muchas veces me preguntan como hago el pelo en mis dibujos, creo que  no hay mejor consejo que ser paciente. Suelo definir los mechones uno a uno y hacer trazos finos con el portaminas para lograr  que esté muy detallado. Para conseguir degradados utilizo un difumino y para las zonas más oscuras simplemente  hago  más presión.

"A lot of times people ask me how I draw hair. I think that the best advice I can give you is to be patient. I define it drawing hair by hair with the mechanical pencil to get a really detailed texture. To get a soft grey gradient in the darkest areas I use a paper stomp."


Para darle un poco de calidez a su piel aplique un poco de color rojo en las zonas de sombra, pero sin presionar mucho para no dejar surcos y darle un matiz sonrosado a  la piel.

"To give a bit of warmth to her skin I added a bit of red shade in the darkest areas, but without too much pressure to get a soft red."

Para  hacer las rosas primero utilicé el lápiz rojo acuarelable y  un lápiz de grafito 4b. Para fundir los colores utilicé un lápiz bastante curioso, el blender de Derwent, que conocí gracias a un review de Sonia M.Corral  (¡una auténtica maestra de los lápices!)


"I used a red  watercolour pencil to paint the roses and a  4B pencil  to shade them.   To get a nice gradient I used a Derwent Blender Pencil, which I discovered thanks to  a  review of  Sonia M. Corral  (a really great artist!!)"


Finalmente acabé de  dibujar el pelo  y el vestido y definí las hojas  y el resto de detalles. ¡Espero que este paso a paso os haya sido útil!


"Finally I finished her hair and clothes and added some  leaves to the roses.
Hope  this  step by step was useful to you!"


¡Feliz 2013! - Happy 2013!

miércoles, 12 de diciembre de 2012

Lucy

Lucy, 2012


Este dibujo nació para ilustrar un artículo sobre vampiros del número 4 de la revista Lupus in Fabula. Me decanté por pintar un retrato de Lucy,una joven pelirroja que sucumbe ante Drácula en la famosa novela de Bram Stoker
Para su postura usé como referencia una fotografía de Caelestis-stock (con su permiso, por supuesto ^_^). 

"I created this illustration for an article about vampires of the digital magazine "Lupus in Fabula". I decided to paint a portrait of Lucy, the young readhead who succumbs Dracula in Bram Stoker's famous novel.
I used a photo of Caelestis-stock as reference for her position (With her permission, of course ^_^). "

En este trabajo utilicé por primera vez una técnica que circula mucho por internet, y que consiste en comenzar a trabajar en escala de grises para definir los volúmenes y después aplicar los colores. En esta imagen podéis ver como definí la forma de la chica y el manto inicialmente. El hecho de centrarse solo en los volúmenes ayuda mucho a perfeccionar la forma de la figura de manera rápida.

"In this work I used for the first time in my live a very popular technique  that consists in using a greyscale to define the volumes of the picture and then apply the colours. In the image on the right you can see how I painted her figure and the cloth. This technique is really useful to improve quickly the mistakes that usually appear when you define a figure."


El siguiente paso consistió en añadir algo de color a la piel y al manto. Utilicé varias capas en modo "superponer", alguna en modo "color" y algún filtro de fotografía, combinando diferentes opacidades para ir generando el color adecuado. La verdad es que tardé un poco en alcanzar el resultado que deseaba n_nU

"The next step was to add some colour to her skin and to the cloth. I used several layers on "overlay" mode and "color" mode and some photo filters, combining them with different opacities. It took me a while until I reached the result that I want n_nU "


A continuación definí con colores más intensos el rostro y el pelo en varias capas en modo "normal" y seguí trabajando en los detalles del cuerpo. El haber contado previamente con los volúmenes en blanco y negro me facilitó bastante el proceso de coloreado.

"Then I used more intense colors to paint her face and hair, using layers in "normal" mode and I kept detailing her body. It was easy to colour having the black and white volumes ! "


Finalmente añadí la sombra de un castillo al fondo, la luna, y algo de neblina para añadir un aire de misterio a la imagen.
El último paso consistió en aplicar algunos efectos de color y saturación sobre toda la imagen para lograr el resultado final.


"Finally I added the background,the castle, the moon and some fog to get a mystery atmosphere. The last step consisted on adding some color effects and saturation to the whole image to get the final result."


A continuación podéis ver a mayor escala algunos de los detalles del dibujo ^_^
"Here you can see some details of the painting in a bigger scale ^-^"


domingo, 27 de mayo de 2012

The Lady and her Guardian

Este es otro de mis trabajos al que le tengo mucho cariño. Pensé en que formase parte de la historia de la que tanto hablo en mis post, pero al final queda descartado. La verdad ese proyecto lo estoy realizando tan a largo plazo (la universidad me consume mucho tiempo) que a veces tengo la sensación de que nunca tendrá una forma definida. Lo bueno es que entre dibujo y dibujo que descarto, aprendo algo nuevo y practico un poco, así que espero que los trabajos definitivos tengan más calidad :)


I really aprecite this work. It was also part of that story that I'm always talking about, but It was finally discarded. Sometimes I think that i'll never finish that project! The university classes and exams take me a lot of time. Anyway I'm happy, because between drawing and drawing I usually learn new things about painting.

 The lady and her guardian WIP 1-2 (2010)

Para comenzarlo realicé un boceto , una vez estructurado todo perfilé a lapiz las lineas definitivas.Normalmente este proceso lo hago solo con lápices y portaminas, ya que me llevo bastante mal con las tintas no digitales. Tanto para los lobos como para la elfa utilicé referencias. Estas son un recurso muy útil para lograr más realismo en un trabajo. No se trata de reproducir la imagen original "tal cual", sino usarla para lograr un trabajo más cuidado y bien proporcionado. Siempre que se usa una imagen de referencia lo mejor es tener el permiso del autor de las mismas. Lo ideal es utilizar stock de uso libre, yo normalmente recurro o bien a fotos propias o a fotos de stock de deviantart, donde la mayoría de los artistas que las suben permiten su uso como referencia sin ninguna restricción. Os dejo el link por si os interesa! http://browse.deviantart.com/resources/stockart/model/  (no olvidéis leer las restricciones al uso de cada imagen que tienen estos artistas).

I allways start my drawings with a sketch, once it's structured I outline it with a pencil. I usually do this step with pencils and mechanical-pencils, because I'm a disaster doing inks !  I used references for drawing the girl and the wolves. Using references makes your drawing look more realistic and it's a great way to learn anatomy! But remember that using a image as reference doesn't mean to trace it! In my opinion you can't learn how to draw when you trace photos or drawings because you only use your hand instead of using your brain or your eyes! When I use references I always try to find free stock from other artists or I use my own stock photos. In deviantart you can find a lot of free stock, check this link: http://browse.deviantart.com/resources/stockart/model/   (But don't forget to read each artist rules about their own stock)


Una vez terminadas las lineas apliqué un coloreado digital. Como podéis ver, al final me cargué al lobo de la parte trasera del dibujo, a menudo mientras coloreo decido cambiar elementos del trabajo. En el caso de esta ilustración no tomé capturas de pantalla del proceso, pero es algo que últimamente estoy haciendo y espero mostraros en futuros post.

When I finished the lines I coloured it digitally. As you can see I deleted the wolf that was behind the elf. I usually change a lot of parts of the drawing when I'm colouring. In this case I didn't take screenshot of the colouring process, but I will post some of other paintings in future posts :) .

Espero que os guste! Un saludo y feliz domingo :)

Hope you like it! Have a nice day! :D

viernes, 25 de mayo de 2012

Aprendiendo a animar


Por primera vez me han dado ganas de aprender a hacer  animación ^-^
He aqui mis dos primeros intentos. Se que no so gran cosa, pero espero mejorar con los siguientes xD

This is the first time that I try to learn how to animate a drawing! ^-^
Here are my two first attempts. I know they are really simple, but I'll try to improve my skills with the next ones :)

lunes, 21 de mayo de 2012

Blue Feelings


Blue Feelings (2010) / Digital Art


Hoy os traigo "Blue Feelings", la verdad es que le tengo mucho cariño a este trabajo. Lo realicé durante el verano del año 2010, en uno de esos días en los que la nostalgia invade el cuerpo. A raíz de este trabajo comencé a plantearme la idea de crear una historia con esta chica como protagonista. La falta de originalidad del personaje me ha llevado a descartarla, pero la historia sigue en gestación en mi mente y espero que salga a la luz en un futuro no muy lejano. Mientras tanto...aquí queda mi elfa azul, sin nombre :)

Today I would like to show you "Blue Feelings", I'm very fond to this painting. I did it in the summer 2010, during a day a day that felt nostalgic. When I finished this work I decided to create a story with this girl as main character, but finally I considered that she look really common and I discarted the idea. The story is still on my mind, I hope I will finish it one day. Meanwhile you have here my dear blue elf without name :)