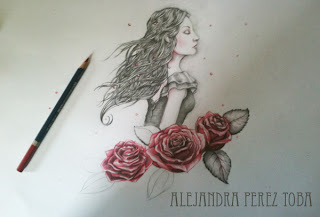
"Roses, 2012"
¡Primer post del 2013! :) Hoy os traigo algunos pasos de como cree el dibujo "Roses". Fue un trabajo muy poco planeado pues lo hice por diversión, así que la composición fue saliendo durante la marcha. Antes de nada me gustaría disculparme por la mala calidad de las imágenes ya que fueron tomadas desde un teléfono n_nU
Materiales utilizados:
· Papel canson tamaño A3, 130gr/m2 ·
· Portaminas con minas B2 ·
· Lápiz rojo acuarelable ·
· Lápiz blender de Derwent ·
· Difuminos de papel ·
"First post of 2013! :) Today I bring you some steps of how I created the drawing "Roses". I did this work just for fun and without planning it too much. I would like to apologize for the quality of the photos, they were took with a mobile phone n_nU"
Tools:
· Canson A3 Paper, 130gr/m2 ·
· 2B Mechanical pencil ·
· Red watercolor pencil ·
· Derwent blender pencil ·
· Paper stomp ·
Para comenzar hice un boceto rápido, para encajar los elementos que planeaba introducir en el dibujo. Siempre prefiero empezar definiendo los rostros y luego seguir con el resto.
"The first step was to draw a quick sketch to place the elements of the drawing. I always prefer to draw the faces first, and then continue with the rest of the work."

Una vez estaba medio definida la cara comencé a detallar el pelo y las pequeñas esferas situadas en primer plano .
"When the face was almost finished I started to detail her hair and the small spheres in the forefront."
Muchas veces me preguntan como hago el pelo en mis dibujos, creo que no hay mejor consejo que ser paciente. Suelo definir los mechones uno a uno y hacer trazos finos con el portaminas para lograr que esté muy detallado. Para conseguir degradados utilizo un difumino y para las zonas más oscuras simplemente hago más presión.
"A lot of times people ask me how I draw hair. I think that the best advice I can give you is to be patient. I define it drawing hair by hair with the mechanical pencil to get a really detailed texture. To get a soft grey gradient in the darkest areas I use a paper stomp."

Para darle un poco de calidez a su piel aplique un poco de color rojo en las zonas de sombra, pero sin presionar mucho para no dejar surcos y darle un matiz sonrosado a la piel.
"To give a bit of warmth to her skin I added a bit of red shade in the darkest areas, but without too much pressure to get a soft red."

Para hacer las rosas primero utilicé el lápiz rojo acuarelable y un lápiz de grafito 4b. Para fundir los colores utilicé un lápiz bastante curioso, el blender de Derwent, que conocí gracias a un review de Sonia M.Corral (¡una auténtica maestra de los lápices!)
"I used a red watercolour pencil to paint the roses and a 4B pencil to shade them. To get a nice gradient I used a Derwent Blender Pencil, which I discovered thanks to a review of Sonia M. Corral (a really great artist!!)"

Finalmente acabé de dibujar el pelo y el vestido y definí las hojas y el resto de detalles. ¡Espero que este paso a paso os haya sido útil!
"Finally I finished her hair and clothes and added some leaves to the roses.
Hope this step by step was useful to you!"
¡Feliz 2013! - Happy 2013!


Genial :D
ResponderEliminarGuau¡¡
ResponderEliminarEstupendo trabajo.
Saludos.
Areku Desings
Brush Art Designs
Deviantart
Arekusan tumblr
precioso :)
ResponderEliminarMuchas gracias chic@s!!! <3
ResponderEliminar